Arduino With MLX90614 and OLED Display
Disclosure: Some of the links below are affiliate links and we only earn a small commission if you purchase through our links at no additional cost to you. The earning mainly used for maintaining the website.
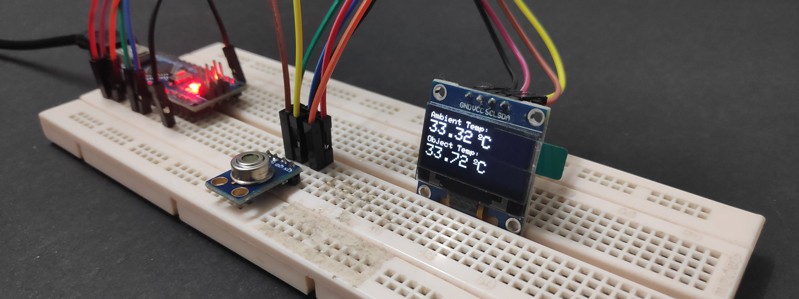
Still plugging your Arduino into a computer to get temperature readings? Use OLED display instead. Organic light-emitting diode (OLED) display is an extremely handy way of interfacing sensor readings.
The computer is good for debugging errors in the program. Building a project that always plugs into the computer for readings is way too bulky and inconvenient.
Stay on in this tutorial to find out how to interface MLX90614 contactless infrared temperature sensor with OLED display.
Starter Pack
- Arduino Uno/Mega/Nano
- MLX90614
- Breadboard
- SSD1306 OLED Display
- Jumper Wires
I2C Wiring With MLX90614 and OLED Display
To work with OLED display, we need an I2C communication protocol which is fairly easy. With only four wires you can hook up the OLED display.
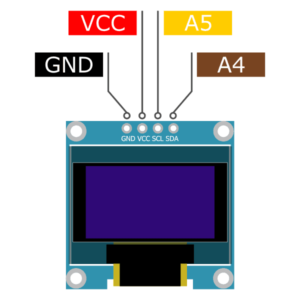
| GND | Ground |
| VCC | 3.3/5.0V |
| SCL | A5/SCL |
| SDA | A4/SDA |
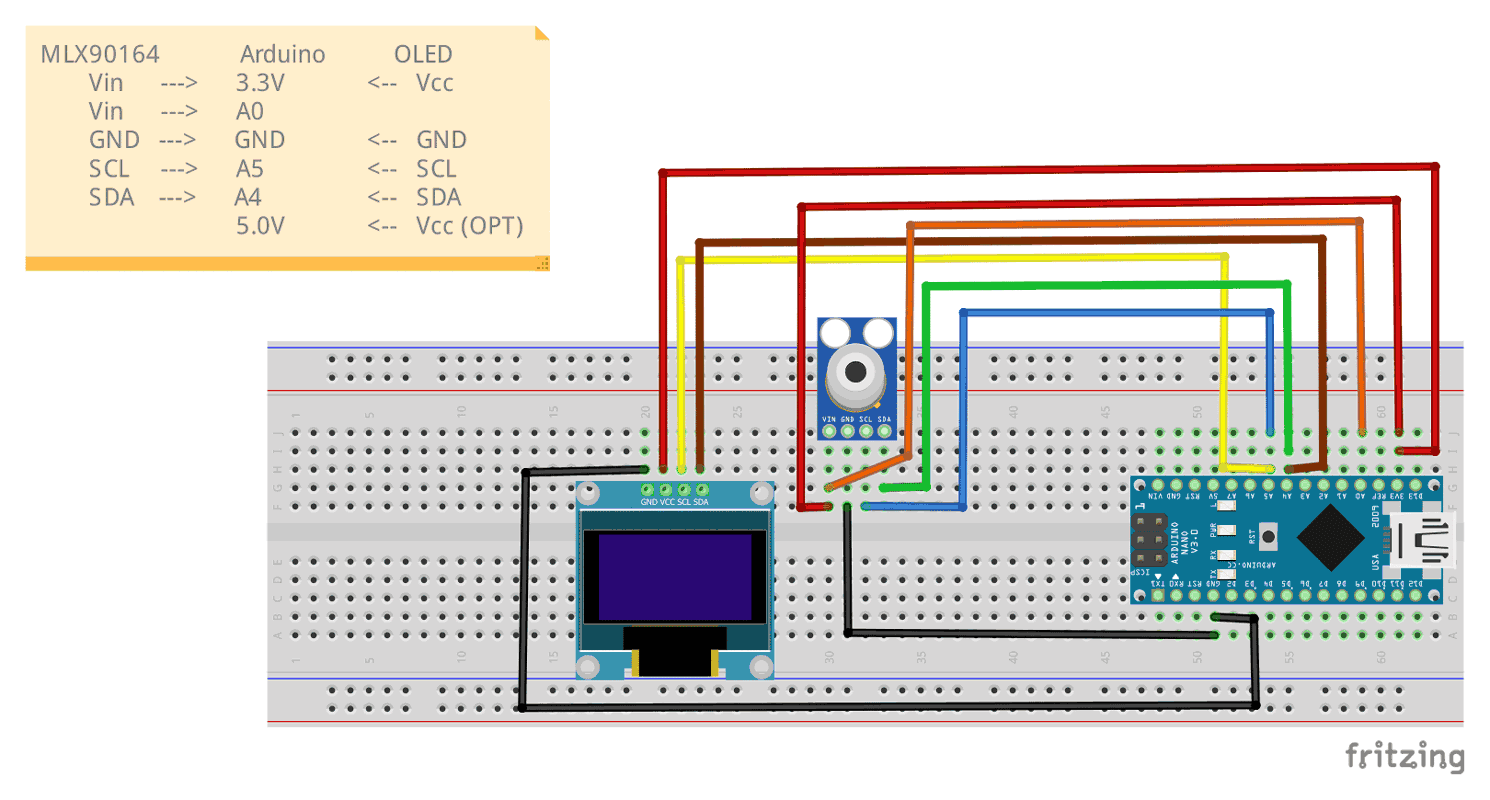
But my Arduino only has one A4 and A5 pin. How do I connect MLX90614 with OLED? They both connect to the same A4 and A5 pin of the Arduino. This is called I2C (inter-integrated circuit), where the master is the Arduino and slaves are MLX90614 and OLED display.

Each of the slaves has its unique address for communication. Only the data with the address can be received and understood by that address of the slave. That’s why I2C allows multiple devices or slaves to be on the same line of communication.
A4 is the serial data and A5 is the serial clock line. The serial data is responsible for sending and receiving data between masters and slaves. The Arduino will request MLX90614 with address 0x5A to send temperature readings. The MLX90614 will then write the temperature readings back to Arduino. Once get the temperature readings, the Arduino will write to OLED ram to display the temperature readings as text.
Serial clock line responsible for synchronizing the clock. The data transmission is controlled by this line. It will be high and low for a start bit, address, read or write bit and stop bit.
Displaying MLX90614 Temperature Readings on OLED
Before working with OLED display, there are some setups that need to do. Downloading, installing, and including libraries to sketch and declare variables. Well, all are easy-peasy.
#include <SPI.h>
#include <Adafruit_SSD1306.h>
#include <Adafruit_GFX.h>

#include <Wire.h>
#include <Adafruit_MLX90614.h>

Adafruit_MLX90614 mlx = Adafruit_MLX90614();

Adafruit_SSD1306 oled(128, 64, &Wire, -1);

float voltComp;
float readAmb, readObj;
float ambTempComp, objTempComp;

void setup() {
  Serial.begin(9600);
  mlx.begin();

  if(!oled.begin(SSD1306_SWITCHCAPVCC, 0x3C)) {
    Serial.println(F("SSD1306 allocation failed"));
    for(;;);
  }

  delay(500);
  oled.clearDisplay();
  oled.setTextColor(WHITE);
}

void loop() {
  voltComp = analogRead(A0) * (3.3 / 775);
  readAmb = mlx.readAmbientTempC();
  readObj = mlx.readObjectTempC();
  ambTempComp = readAmb − (voltComp − 3) * 0.6;
  objTempComp = readObj − (voltComp − 3) * 0.6;

  oled.clearDisplay();
  oled.setCursor(0, 0);
  oled.setTextSize(1);
  oled.print("Ambient Temp: ");
  oled.setCursor(0, 10);
  oled.setTextSize(2);
  oled.print(ambTempComp);
  oled.setTextSize(1);
  oled.print(" ");
  oled.cp437(true);
  oled.write(167);
  oled.setTextSize(2);
  oled.print("C");

  oled.setCursor(0, 30);
  oled.setTextSize(1);
  oled.print("Object Temp: ");
  oled.setCursor(0, 40);
  oled.setTextSize(2);
  oled.print(objTempComp);
  oled.setTextSize(1);
  oled.print(" ");
  oled.cp437(true);
  oled.write(167);
  oled.setTextSize(2);
  oled.print("C");

  oled;display();
  delay(250)
}
Libraries for OLED Display, SSD1306
Because the readings involve decimal places, “float” variables are used here.
Go to Tools > Manage Libraries, type “ssd1306” and install “Adafruit SSD1306”.

Go to Sketch > Include Library and scroll down and search to include “Adafruit SSD1306”.

Libraries for OLED Graphic, GFX
When you install “Adafruit SSD1306” library, a prompt out will as to install dependencies library “Adafruit GFX Library”. Just click install all.

In case you miss it, go to Tools > Manage Libraries, type “gfx” and install “Adafruit GFX Library”.

Go to Sketch > Include Library and search to include “Adafruit GFX Library”.

Include SPI Library

If you have this kind of error, try to include “SPI Library”. Go to Sketch > Include Library and search for “SPI” to include the library. We do not need it but just for compiling the sketch purpose.

Declare Variables
Create an object “oled” for the Adafruit_SSD1306 class and pass parameters as above. As the OLED display is 0.96” (width is 128 and height is 64), the first two parameters is the width and height. The third parameter, “&Wire” is to use I2C as communication and the “-1” to tell the Arduino that the OLED does not have reset pin.
Void setup()
Serial.println(F("SSD1306 allocation failed"));
for(;;);
}
The “oled.begin(VCC Selection, Address)” accepts two parameters. In most situation, “SSD1306_SWITCHCAPVCC” voltage mode is used. The breakout board of OLED will setup the voltage to power up the screen. 31.65V to 3V for logic operation and 7V to 15V for screen. For 128 by 64, 0x3C is the address for communication. If you are having trouble with this address, us I2C scanner to get the OLED address. The code above is to show whether the OLED is communicating with Arduino or not.
To clear up the screen. Always use this function to clear previous text.
Set the color of text to be “WHITE” or “BLACK”.
Void loop()
Always to clear the text at first line of code. If not, you will get the screen stuck with overlapping text and is unreadable at all.
oled.setCursor(int x, int y);
Set the location of the text, “(0, 0)” from the top left of the screen.

oled.setTextSize(int);
Make the text bigger. Only accept integer. Put “2” means the text is 2 pixel bigger.

oled.print(“message”);
To print message to the OLED display.

oled.cp437(bool);
Accept “true” or “false”. To enable Code Page 437 compatible charset. You can see the list of character at Wikipedia.
oled.write();
To write byte of data.
oled.display();
To push data into OLED ram to display the text.

Voltage Compensation Equation
The tweak to minimize the temperature errors is to apply the voltage compensation equation. You can find the equation at the MLX90614 datasheet by Melexis (page 37). That simple only.
You may notice I stored the ambient and object temperature in “readAmb” and “readObj” rather than using the object function. I want the temperature readings to be the same for uncompensated and compensated at that point of time. So in this way, I can show that the equation can minimize the temperature errors.

Nay! We Love Videos
Bye Bye
Adding an OLED display is quite convenience and easy to make a readable display to your projects. It is troublesome to plug to computer to get sensor readings.
Hope you find this tutorial helpful in your project. Subscribe to our newsletter for more tutorials.
hey, should the code have oled.println or oled.print?
hi, both “oled.println” and “oled.print” are accepted. “oled.println” will have default next line spacing. If you want to have bigger spacing between next line then use “oled.setCursor(x, y)” and “oled.print”.
Oh I didn’t know that, thank I am new to the world of oled i was using a 16×2 lcd back then for everything
Not wrong with that. But I prefer oled because of its size and easy to interface it.
hey, can you explain this line code? “voltComp = analogRead(A0) * (3.3 / 775);” why should “775”?
Hi, I use “775” because I find it best fit for reading 3.3V. Look the photo for explanation.
Okay, then if I use NodeMCU ESP8266, what should I change?
Use “voltage = analogRead(A0) * (3.3 / 1023)”. Because in NodeMCU, 0 –> 1023 represents 0V –> 3.3V.
Make sure your maximum input only 3.3V or else your NodeMCU will burn.
Oh okey I get it, thanks for the explanation, very clear.
Happy coding ^.^